Installing Oracle SOA-BPM Release 11gR1 (11.1.1.7.0) (PS6), Oracle Service Bus (OSB) 11gR1 (11.1.1.7.0) and JDeveloper 11g (11.1.1.7.0) on Windows 7 64 bit
This blog describes how to install SOA-BPM Suite (including Oracle Service Bus) from scratch on Windows 7 64bit machine.
Step1: Downloading Required Software.
Go to Oracle SOA suite download page here.
Under Oracle SOA Suite 11g Installations, select release 11.1.1.7 and then Generic 64-bit JVM.
JDK 64 bits from Sun jdk-6u27-windows-x64.exe
Database - Oracle XE Universal - OracleXE112_Win32.zip
Oracle WebLogic Server 10.3.6 - wls1036_generic.jar
Repository Creation Utility 11.1.1.7.0 - ofm_rcu_win_11.1.1.7.0_32_disk1_1of1.zip
SOA Suite 11.1.1.7.0 (2 parts)
ofm_soa_generic_11.1.1.7.0_disk1_1of2.zip
ofm_soa_generic_11.1.1.7.0_disk1_2of2.zip
Oracle Service Bus 11.1.1.7.0 ofm_osb_generic_11.1.1.7.0_disk1_1of1.zip
OEPE Windows All-In-One (x86 64-bit) oepe-indigo-all-in-one.zip
JDeveloper 11.1.1.7.0 Generic (jar) jdevstudio11117install.jar
JDeveloper extension for SOA - download here
Create c:\stageFMW to hold the download files used for installation
Step2: Installing the JDK.
JDK, SOA Suite, OEPE
and OSB will be installing to the middleware home (C:\Middleware\ SOASuite11gR1PS6).
If you use a different middleware home then adjust accordingly.
Provide folder name as
C:\Middleware\ SOASuite11gR1PS6\JDK160_27 as shown below and install the JDK 64
bit
Click Ok.

Click Next and finish

Step 3: Installing Database:
Run file OracleXEUniv.exe and install the XE database. You
may refer the Oracle XE installation guide.
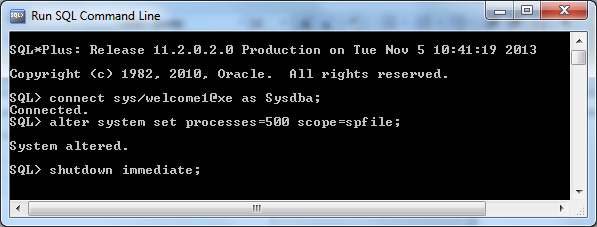
After installing XE, run below commands to meet the
requirements of SOA 11g installation –
connect sys/password as sysdba;
alter system set processes=500 scope=spfile;
shutdown immediate;
alter system set processes=500 scope=spfile;
shutdown immediate;
Start database.

If you are using Oracle XE
as your database, you need to set the RCU_JDBC_TRIM_BLOCKS environment variable
to TRUE prior to running RCU.

Step 4: Install database schema using RCU
Run the Repository Creation Utility (RCU) to create the
database schemas:

Click Next

Enter the database information.

Ignore any warning messages during installation.
Select the component SOA and BPM Infrastructure. Dependent
schemas are selected automatically.

Select the radio button to Use the same password for all
schemas. Enter a schema password.


Click Create to create the tables.

On “Completion Summary” page you should see success status for all the components you chosen.

Step 5: Install WebLogic 10.3.6 Server 64 bits on windows
In a command window enter
Cd C:\stageFMW\Weblogic
java -D64 -Xmx1024m -jar wls1036_generic.jar

Click Next

Select Create a new Middleware Home and enter C:\Middleware\SOASuite11gR1PS6. If you use a different middleware home then adjust accordingly.

Deselect the checkbox to
receive security updates and Click Next.

(If you are behind firewall or using using proxy to connect internet then wizard may not show next window immediately. Deselect multiple times till you receive the below window.)
Select the check box as shown below to disable internet access.

Select Typical installation
and Click Next.

As we downloaded the
generic version of Weblogic, Select the installed JDK (C:\Middleware\SOASuite11gR1PS6\jdk160_27).

Review the directories and
Click Next.

You will see the installation
summary. Click next.
Uncheck ‘Run Quickstart’
and Click Done when the installation completes.


Step6: Install SOA Suite – Base Components
In a command window enter (-jreLoc JDK installation
location)
cd C:\stageFMW\SOA\Disk1
setup.exe -jreLoc C:\Middleware\SOASuite11gR1PS6\jdk160_27
(-jreLoc point to
the JDK installation location)

Click Next.

Skip software updates and click Next.

Click Next. After the prerequisite check.

On the Specify Installation Location screen, select the
Middleware home: C:\Middleware\SOASuite11gR1PS6
Accept the default
Oracle home: Oracle_SOA1

Click Next

Accept the default on the Application Server page and click
Next
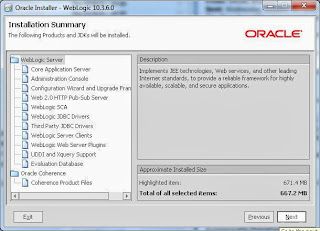
Review summary
Click Install

Wait for the install to complete – takes a few minutes.
When install reaches 100%, click Next

Click Finish

Step 7: install OEPE
Unzip the oepe-indigo-all-in-one-11.1.1.8.0.201110211138-win32-x86_64.zip to the folder C:\Middleware\SOASuite11gR1PS6\oepe11118
Step 8: Service Bus installation
In a command window enter
cd c:\stageFMW\OSB\Disk1
setup.exe -jreLoc C:\Middleware\SOASuite11gR1PS6\jdk160_27

Click Next

Select “Skip Software Updates” and click Next

On the Specify Installation Location screen, select the Middleware home:
C:\Middleware\SOASuite11gR1PS6
Accept the default Oracle home: Oracle_OSB1

For the installation type, select Typical and press Next.

Click Next. After the prerequisite check.

Select the OEPE location C:\Middleware\SOASuite11gR1PS6\oepe11118. Click Next and Install

Once the installation process has finished, press the Next button

The installation is now complete. Press the Finish button to exit the installer.

Step 9: Create a SOA Developer Domain
In a command window enter
Cd C:\Middleware\SOASuite11gR1PS6\wlserver_10.3\common\bin
Config.cmd

When the configuration wizard welcome screen comes up, select Create a new WebLogic
domain, click Next Select “Generate a domain….“ and select
a) Oracle SOA Suite for developers – 11.1.1.0 [Oracle_SOA1]: This automatically selects
Oracle WSM Policy Manager – 11.1.1.0 [oracle_common]
b) Oracle Enterprise Manager – 11.1.1.0 [oracle_common]
Optional (dependant on the components you want to use):
c) Oracle Service Bus for developers – 11.1.1.7 [Oracle_OSB1]: This automatically selects
WebLogic Advanced Web Services for JAX-RPC Extension – 10.3.6.0 [wlserver_10.3]
d) Oracle Business Activity Monitoring – 11.1.1.0 [Oracle_SOA1]
e) Oracle BPM Suite for developers – 11.1.1.0 [Oracle_SOA1]
f) Oracle JRF WebServices Asynchronous services – 11.1.1.0 [oracle_common]
Click Next

Enter the domain name, e.g. soaosbps6devdomain and choose a location of your choice. Click Next

Enter user name weblogic and a password welcome1.

Click Next

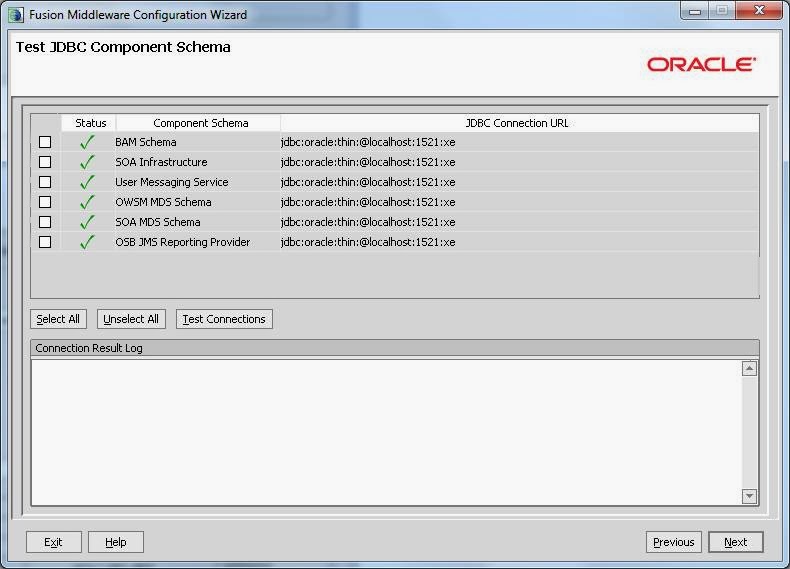
On the Configure JDBC Component Schema screen, you select the components that you want to change, and then enter the property value for those components.
First, select all of the components and enter password in the Schema Password field.
Or, if you used a different password when you created the schema with RCU, enter that password. With all of the check boxes still selected, enter the Service, Host, and Port values

The data source connections are all tested.
If all are successful, click Next, otherwise click Previous and correct any errors.
Click Next

Click Next

Uncheck the check box (start the
admin server) and Click Done.

Step 10: Installing JDeveloper and JDev SOA Extension
In a command window entercd c:\stageFMW\JDev
java -D64 -Xmx1024m -jar jdevstudio11117install.jar

Click Next

Use existing middleware Home C:\Middleware\SOASuite11gR1PS6
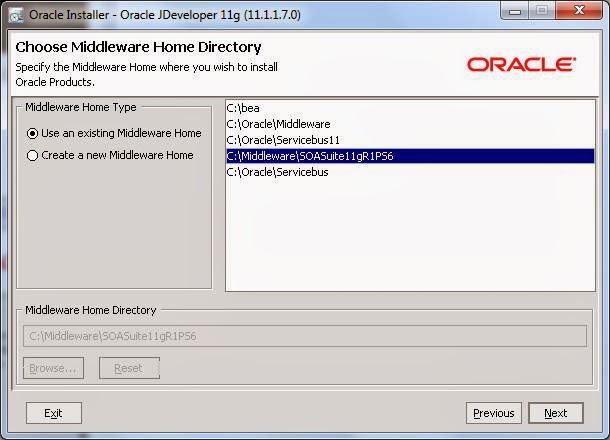
Error window will be displayed as shown below.

So select a new Middleware Home directory and provide Middleware Home Directory as C:\Middleware\SOASuite11gR1PS6\JDev11gR1PS6 to proceed JDeveloper installation.

Choose Install Type: Complete, click Next

Select the installed JDK (C:\Middleware\SOASuite11gR1PS6\jdk160_27). Click Next

Confirm Product Installation Directories. Click Next

Click Next

Review Installation Summary. Click Next.

Wait for the installation to complete – a few minutes. Click
Next

When installation completes, deselect Run Quickstart and click Done.
Start JDeveloper Studio 11.1.1.7.0 from the Windows Programs menu: Oracle Fusion Middleware 11.1.1.7.0
or run C:\Middleware\SOASuite11gR1PS6\JDev11gR1PS6\jdeveloper\jdeveloper.exe

Select Default Role,
de-select Always prompt for role selection on startup, and click OK

If you see the Confirm Import Preferences dialog click Yes
or No as desired, usually No is appropriate.

Step 11:Update JDeveloper with latest SOA extension
Select Help/Check For Updates

Click Next

Select install from local file.
Browse for file soa-jdev-extension.zip and open.
Click Next

Click Next and Finish.
Click Yes to restart the
JDeveloper and finish the installation of the SOA extension.

Step 12:Starting servers
Start the Admin Server
Open command window and enter the command
Cd C:\Middleware\SOASuite11gR1PS6\user_projects\domains\soaosbps6devdomain\bin
startWeblogic.cmd

Admin Server console

Weblogic Admin console URL: http://localhost:7001/console

Weblogic Enterprise Manager Fusion Middleware Control (EM) console
URL: http://localhost:7001/em

Weblogic osb console URL: http://localhost:7001/sbconsole

Start BAM Server
Open command window and enter the command
Cd C:\Middleware\SOASuite11gR1PS6\user_projects\domains\soaosbps6devdomain\bin
startManagedWeblogic.cmd bam_server1

Enter admin user credentials
username weblogic
password welcome1

BAM console

Open internet explorer and type the URL : http://localhost:9001/OracleBAM

hi ,i have down all of your way to install bpm
ReplyDeletebut in run oracle bpm processor i got error
"a connection to server has failed(status=12004)"
can u guide me?
my email address is:sahar.alijannejad@gmail.com
can I got ur email?
regards
sahar
very helpful steps...thanks for sharing
ReplyDeleteVery nice tutortial
ReplyDeleteThanks for sharing. This link very very help full
ReplyDeleteThis is amazing blog,It is very helpful for developer
ReplyDeleteOracle SOA Online Training
Simply wish to say your article is as astonishing. The clarity in your post is simply great, and I could assume you are an expert on this subject. Same as your blog i found another one Oracle Service-Oriented Architectures .Actually I was looking for the same information on internet for Oracle SOA Suite and came across your blog. I am impressed by the information that you have on this blog. Thanks a million and please keep up the gratifying work.
ReplyDeleteinstagram takipçi satın al
ReplyDeleteinstagram takipçi satın al
aşk kitapları
tiktok takipçi satın al
instagram beğeni satın al
youtube abone satın al
twitter takipçi satın al
tiktok beğeni satın al
tiktok izlenme satın al
twitter takipçi satın al
tiktok takipçi satın al
youtube abone satın al
tiktok beğeni satın al
instagram beğeni satın al
trend topic satın al
trend topic satın al
youtube abone satın al
instagram takipçi satın al
beğeni satın al
tiktok izlenme satın al
sms onay
youtube izlenme satın al
tiktok beğeni satın al
sms onay
sms onay
perde modelleri
instagram takipçi satın al
takipçi satın al
tiktok jeton hilesi
instagram takipçi satın al pubg uc satın al
sultanbet
marsbahis
betboo
betboo
betboo
instagram takipçi satın al
kayseriescortu.com - alacam.org - xescortun.com
ReplyDeleteEn son çıkan perde modelleri
ReplyDeletesms onay
Türk telekom mobil ödeme bozdurma
NFT NASIL ALİNİR
ankara evden eve nakliyat
Trafik sigortasi
dedektor
KURMA WEBSİTESİ
aşk kitapları
Smm Panel
ReplyDeleteSMM PANEL
iş ilanları
İnstagram takipçi satın al
Hırdavatçı Burada
beyazesyateknikservisi.com.tr
SERVİS
tiktok jeton hilesi
pendik daikin klima servisi
ReplyDeletetuzla toshiba klima servisi
tuzla beko klima servisi
çekmeköy lg klima servisi
ataşehir lg klima servisi
çekmeköy alarko carrier klima servisi
beykoz beko klima servisi
üsküdar beko klima servisi
pendik lg klima servisi